A Brief Intro to C++ 1
Please note that this book is a work in progress! I would greatly appreciate your feedback, and if you would like to be notified of when a new chapter comes out please sign up below. Thank you!
Keep me updated!
S
ince we are using the Unreal Engine to code Minecraft in, we will have to abide by their standards. The choice of language for Unreal is C++. This is helpful because C++ is a very barebones language. This means that there are some inherent risks, as well as some great rewards from using the language.
There are a few differences with C++ compared to other higher-level programming languages. In C++ you can have direct control over memory and where items are stored in memory. The most accentuated case of this are pointers. Also, you can store references to different objects in C++. So, you could have a reference to an object that you pass to a function, and you could change the value inside the function without returning a new variable.
Section 1—Visual Studio
Before you can even begin coding in C++ you will need the necessary software to compile the code. That means you will need to install some programs. Now, the simplest tool for doing this, in my opinion, is Microsoft’s Visual Studio. The version of Visual Studio that this book will be using is the 2017 version. The specific version is not too important, as most of the functionality will be the same.
You can find the installation for Visual Studio at this link: https://www.visualstudio.com/downloads/ and if you follow the download instructions you should be fine. You can install the free version, which is the version I am using. There is no need for the functionality found in the paid versions. Simply use the default instructions when downloading this software. It will download all the necessary components to compile C++ code for you.
If you would rather not download Microsoft Visual Studio, you can follow the instructions at this Stack Overflow question: https://stackoverflow.com/questions/1115698/. I would highly recommend that you stick with Visual Studio though, it makes your coding much more efficient, and lends a helping hand in many different scenarios.
Section 2—Hello World
In this section I will take you through how to build your first C++ program. We will build a very simple program that simply outputs “Hello World.”. First open Visual Studio, then select Create New Project, which will bring up a dialogue like Figure 1-1.

Then, on the left-hand panel, select Visual C++->General. It will bring up a dialogue that should look just like Figure 1-1. Select Empty Project in the dialogue and give it a name in the bottom panel and select the location of where you would like the project to be saved. Then press OK and let Visual Studio create the project.
Once the new project is created you will be presented with a, possibly, daunting User Interface. It is quite simple, and I will explain what each part of this User Interface is used for. There are three main screens, the Console, the Solution Explorer, and the Workspace.
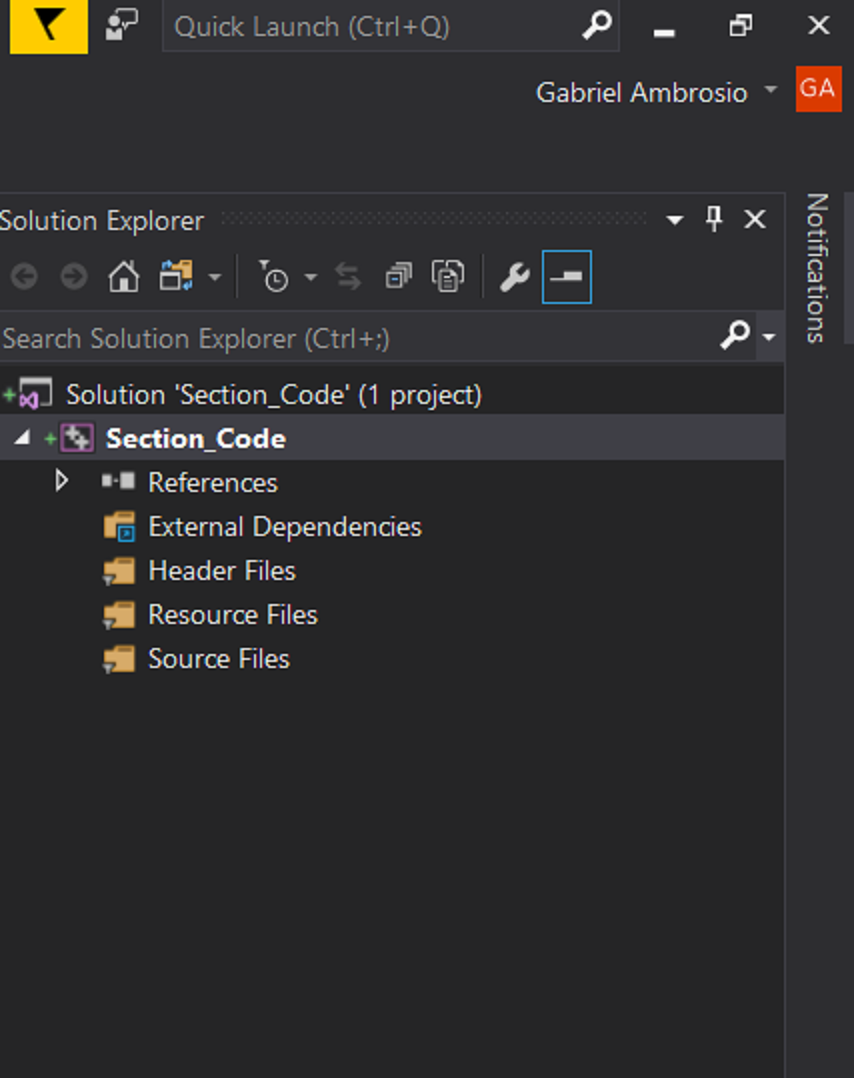
On the right-hand panel you will find the Solution Explorer. This space is generally used for creating new files, or searching through your directory to open a file that is in your project, or to delete files, etc. It looks like Figure 1-2.

If you do not see the solution explorer do not fear, you can open it up. To view the Solution Explorer, go to View, which is located along the top ribbon, and select View->Solution Explorer. That should bring up the panel on the righthand side of your screen. The next panel is the Console.
The Console is responsible for displaying errors and output. We will mainly use it for errors, and only in this Chapter. The Console should look like Figure 1-3 and it will be located on the bottom of the screen. You can toggle between looking at the errors and the output by pressing the Error List or the Output tab located at the bottom left corner.
The last panel is the main panel that covers most of the screen. This is your workspace. This is where anything that you are coding will appear and where you will spend most of your time.
Now that you have your project created and are familiar with Visual Studio, we will code our first program. In your Solution Explorer, right click the folder labeled Source Files, then press Add->New Item. This will open a window, within that window, in the left hand panel select Visual C++. Then, in the central panel select C++ File (.cpp). You will be able to name your file in the dialogue at the bottom, I suggest naming this file Hello World.cpp. I would also recommend that you leave the Location as the default. Then click add.
This will add a new C++ file to your solution. Now that we have added the file we can finally begin to write some code! Simply type the following code, or copy and paste (but I highly recommend typing it out yourself!), into the editor.
#include <iostream>

int main() {
  std::cout << "Hello world!" << std::endl;
  return 0;
}
Now let’s walk through this code step by step. If you have written code in HTML/CSS, you may be familiar with “linking” other code in via the link and script tags. In C++ #include is essentially the same thing. You can use this line of code to include other libraries. It basically tells the compiler, “Wait a second! Before you run this make sure that this other code is included!”. Iostream is a library of templates in C++ that allows you to conduct essential input/output operations.
Next up is the main function. This is a function that is required to be in at least one class of your solution. This is the function that will jumpstart your program, it works essentially the same as the main function in Java the only difference is that it is required to return a 0. If you have ever run into an error in a program you were using that says something like Error: Exited with nonzero exit status, it is because the program returned something other than 0 in the main function.
Now the first line of code in our Hello World program prints out “Hello World!” to the screen. In the iostream, the easiest way to do this is by calling cout, which stands for character output. The << operator puts whatever is on the righthand side of it into the left hand side. So, in this case, it puts “Hello world!” straight into the character output. The << operator is additive to, meaning that you can pipe multiple objects together. So the last bit on that line, std:endl; adds an endline character to the end of our sentence.
I have somewhat evaded the question of what std:: is. In C++ this is what we call a namespace. The best way I have come to think of it is that it is a static class. Std simply stands for the standard class, and the :: operator means we are accessing a static variable of the standard class, in this case character output. So, putting the whole line together should give us an output to the screen which displays, “Hello world!”. How do we run it?
To run the code, we must compile it first. In Visual Studio to compile the code go to Build->Build Solution, or Ctr+Shift+B. This will compile the code. You should notice that the output runs, and you should get an output like this:
1>------ Build started: Project: Section_Code, Configura-tion: Debug Win32 ------
1>Hello World.cpp
1>Section_Code.vcxproj -> C:\Users\ambro\CodingMinecraftEdition1\Coding Mine-craft\Chapter 1\Section_Code\Debug\Section_Code.exe
===== Build: 1 succeeded, 0 failed, 0 up-to-date, 0 skipped =====
This tells us that our build succeeded. To run the code, go to Debug->Start Without Debugging, or Ctr+F5. This will begin to execute the code without debugging. What you will notice is a command prompt window appears and then disappears very quickly. This is because our code is executing, and then ending. To pause the code long enough for us to see it we need to add in one line of code. Change your code to match this:
#include <iostream>

int main() {
  std::cout << "Hello world!" << std::endl;
  system("pause");
  return 0;
}
The only thing I have changed is that now there is the line that says system(“pause”); in between our first two lines. What this will do is pause the system until the user presses another key. To run this, you can simply press Ctr+F5 and then answer yes when Visual Studio prompts you to build the code. You should have a command prompt window appear that says, “Hello world!” and says to press any key to continue. And now you have completed your first C++ program!
Section 3—Control Flow
The way you conduct control flow in C++ is very similar to any other programming languages. I will give a brief example of the main control flow statements.
If-statements in C++ are very simple. We will add a simple statement to our Hello World program to experiment with if statements. Add this block anywhere before the system(“pause”); line in your main function.
if (true) {
  std::cout << "This block executes because the condition evaluates to true." << std::endl;
}
else {
  std::cout << "This block executes because the condition evaluates to false." << std::endl;
}
As you can see if you run this code, the top sentence will display when you execute this if-else statement. If you switch out the condition of true to false, then the else-clause will execute. As I said previously, I expect the reader to have familiarity with programming, if this is all new to you, I would highly recommend going to this link: http://www.cplusplus.com/doc/tutorial/control/. You can also extend this if-else clause into an if-else if-…-else clause simply by adding in else-if statements.
For-loops are essentially the same as they would be in Java or some other language. Add in this block of code in your main function.
for (int i = 0; i < 10; i++)
{
  std::cout << i << std::endl;
}
When you execute this code, you will get the numbers 0-9 printed onto the console. The first argument in the for loop is the variable, the second argument is the stopping condition, and the third argument is the increment. So you could rearrange this into many many different ways.
In addition to regular for-loops, C++ also provides for-loops that loop over a structure of data. For instance, say that you have a string and you would like to loop over every character in the string. One way of doing this would be to loop through 0 to the length of the string, and then assign the character at index n of the string to your current variable. In C++ though, there is a shortcut for this.
In your code, add in a #include <string> statement at the very top of your code. After that, add this block of code into your main function:
std::string str = { "Hello!" };
for (char c : str)
{
  std::cout << c << std::endl;
}
This code will output each character in the string we declared on its own line. This is very useful when you are looping through an array, a list, a map, or any such structure, and it will be used quite often in game programming. What if you have no idea what type you are iterating over though? Say for instance you have an inventory that could be one of several types. There is no need to worry because C++ provides a way to iterate over a data structure without knowing the type that the data structure stores! Type this next code block into your program in the main function:
std::string str = { "Hello!" };
for (auto c : str)
{
  std::cout << c << std::endl;
}
This is very similar to the last code block; the only difference is that we changed char to auto. This is very useful if you simply do not want to specify the type, or if you have no idea what the type may be.
The next control flow structure we will look at is while loops. C++ supports the while-loop and the do while loop. The while loop will only execute if the condition is false, and the do while loop will execute once regardless of the condition, and then it will continue to execute depending on the condition. Here is an example of the while loop.
int i = 0;
while (i < 10)
{
  std::cout << i << std::endl;
  i++;
}
If you execute the above code, it will print out the same thing as our first for loop. It will output the number 0 through 9 each on its own line. If you have experience with other languages, this is once again very similar to those languages.
Next up is the do while loop. This loop is interesting because it will run at least one time no matter what the condition is. Add this code into your main function.
do {
  std::cout << "I run at least once" << std::endl;
} while (false);
There are two main things to notice about this code. The first thing is that this line of code will execute even though the condition is false. The second thing to notice is that you must end this block with a semicolon! This is off-putting because normally loops do not require semicolons, but since the con-dition is outside the brackets, it must have a semicolon so that the compiler knows where the line ends.
C++ implements a couple more control flow features such as the goto statement, and the switch statement. I will not delve into these features be-cause they are not necessary for this project, if you want to learn more about them though go to this link: http://www.cplusplus.com/doc/tutorial/control/. And that wraps up the control flow features of C++!
Section 4—Pointers
In the strange world of C++ there are things called pointers. What are these things? Well, the short definition is that a pointer is a memory address stored at a different location in memory. Why in the world is this a thing?
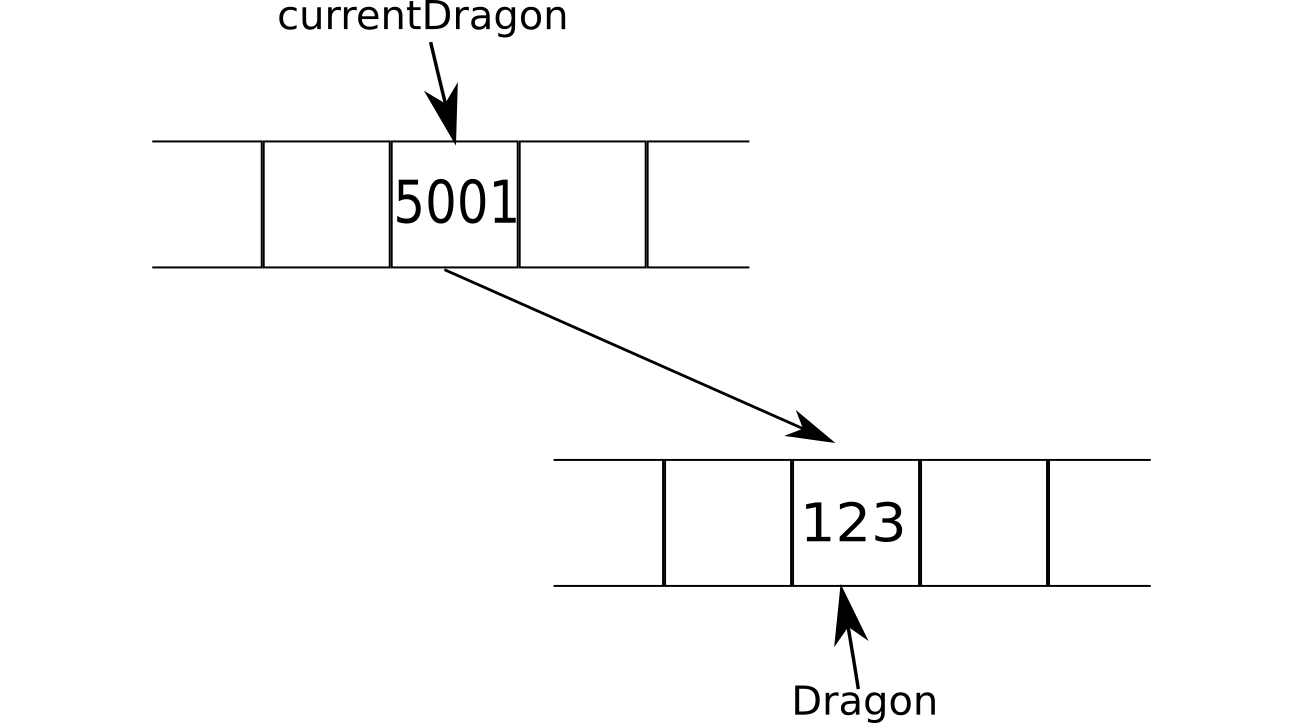
Imagine that you are coding a game, and in that game, you have a player. Instead of storing that player as a conglomeration of several variables, you may want to create a class called player. Now, when you instantiate a player, you create a massive object in memory because this player contains many different variables and functions and it takes up quite a bit of space. One way to look at this instantiation would be to look at our dragon object in Figure 1-4. The Dragon object is an instantiation of a Dragon class, and it is stored in memory at the address 123 of our fictitious computer. Now, what if we wanted to call one of the functions on this Dragon object? Would we allocate a whole new portion of memory to load in all the Dragon objects functions to be able to call it? No. We would simply point to where the dragon is in memory, and let it do the rest from there.

If you look at Figure 1-5 it shows this process in action. The process it is showing is that the programmer has created a variable currentDragon which points to this object. The current dragon variable is stored in memory at address 5001, and it basically just contains the address 123. This way, when the programmer references current dragon, the code simply has to point its way to the correct variable instead of allocating a lot of new memory that will only be used once.
The best way to see this in action is to experiment with it. Before we can ex-periment though, you need to know the syntax behind pointers. In C++ to declare a pointer you would write the code like this: Dragon* dragon = new Dragon();. This code instantiates a pointer that references the dragon class. The asterisk, * , is what tells C++ that this is a pointer. To see what is at the memory address we would have to dereference the pointer. Dereferencing the pointer is syntactically the same and requires an asterisk. So say you wanted to print out what was at that memory address, you would write this code: std::cout << * dragon;. The asterisk in front of the variable ensures that it is dereferenced. To find the memory address of an object, you would use the & operator. This operator essentially means, address of. So when you use that operator in conjunction with any variable, it will give you the address of the variable. Let’s code. Write the following code into your main function.
int numOne = 5;
int* addressOfNumOne = &numOne;

// The address operator in action
std::cout << "The address of numOne is: " << addressOfNumO-ne << std::endl;
std::cout << "The address of numOne is: " << &numOne << std::endl;

// The dereferencing operator in action
std::cout << "The value stored in numOne is: " << numOne << std::endl;
std::cout << "The value stored in numOne is: " << * addressOfNumOne << std::endl;
If you run the above code you should get an output similar to the following:
The address of numOne is: 005EFA1C
The address of numOne is: 005EFA1C
The value stored in numOne is: 5
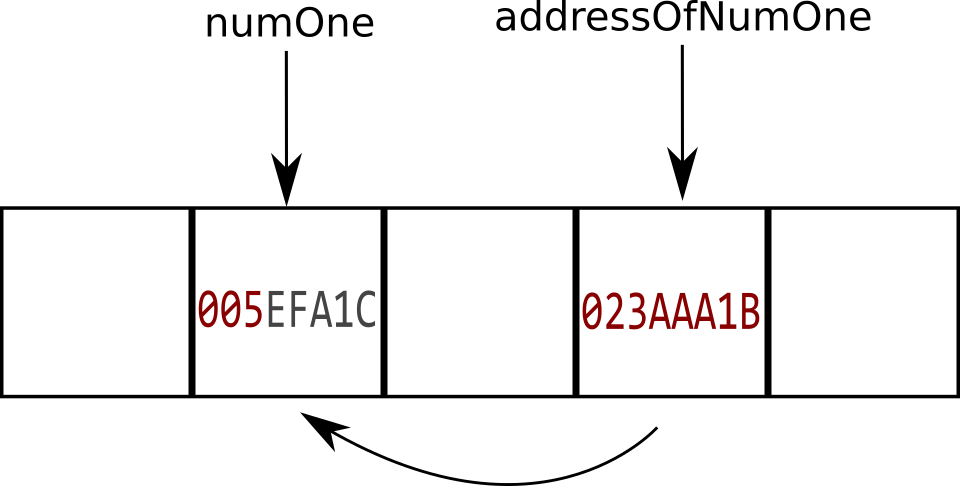
The value stored in numOne is: 5Now the address is going to be different for your computer. What is happening here is that our code is creating a variable that we call number one. We assign the value of 5 to this number. Next, we create a pointer to that number, we call this address of number one. This pointer contains the address of number one. The way we get that address is by using the & operator. If we want to find the value stored at that address, we use the dereferencing operator. Figure 1-6 should illustrate more of what is happening.
As the diagram illustrates, our variable address of number one is stored at a different address, but it points to number one. What would happen if we introduce a third variable that is the dereferenced form of address of number one? Let’s try it out. Write the following code directly below the code we just wrote.
int numTwo = * addressOfNumOne;
std::cout << "The value at numOne is: " << numOne << std::endl;
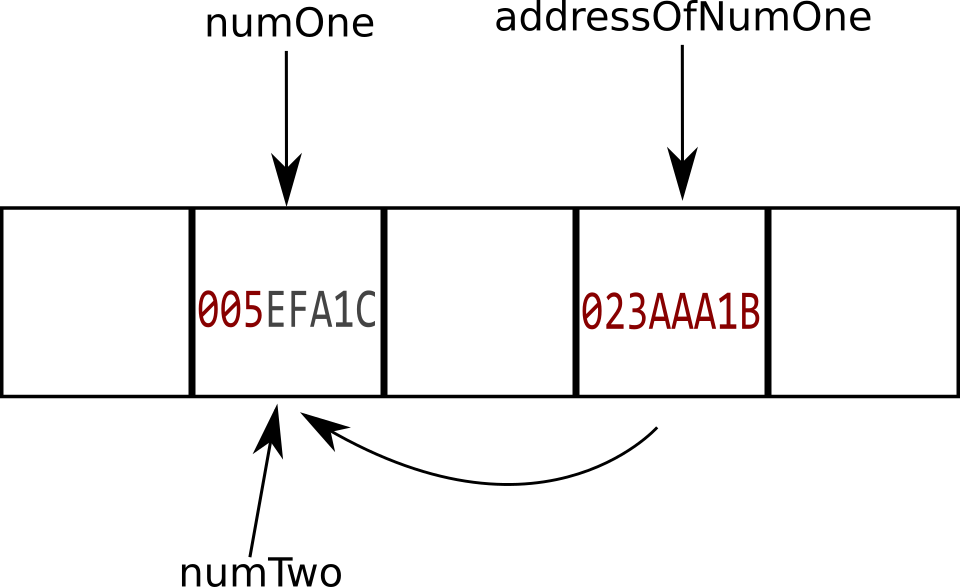
std::cout << "The value at numTwo is: " << numTwo << std::endl;This code introduces a new variable called number two. This variable is initialized as the dereferenced address of number one. This is very important, because what we have just done is created a new variable that is stored at the exact same location as number one! Figure 1-7 illustrates this.
This is very interesting indeed! What do you think would happen if we change the value stored in number one? How about the value stored in number two? Let’s try it out and see what happens!
numTwo = 20;
std::cout << "The value at numOne is: " << numOne << std::endl;
std::cout << "The value at numTwo is: " << numTwo << std::endl;
If we run the previous code, we will find that when we change value at number two to 20, the value at number one also changes to 20! This is exactly to be expected too, since number two resides at the same address as number one. Now you may have seen this behavior in a programming language like python. If you have python installed, try the following code.
>>> myList = [1, 2, 3]
>>> myOtherList = myList
>>> myList == myOtherList
True
What just happened there? If you are not familiar with python code, we just declared a variable called my list and gave it a value and declared another variable and assigned it to my list. When we check to see if they equal each other, we get that it is true. Python runs off C++, and if we were to look behind the scenes, we would find that my other list is a dereferenced pointer to my list!
So hopefully this is a good introduction to pointers. Pointers are a very complicated subject, especially for newcomers to the C language. If you would like additional information on pointers, the documentation is great, and you can find it at this link:http://www.cplusplus.com/doc/tutorial/pointers/.
Section 5—Header Files
Header files are another difference in C++ from other languages. In most languages, you declare variables and functions as you need them. Looking back at our Dragon example above, when you need a new method in the Dragon class you would just define it in the same file. In C++ this process is slightly different.
In C++ you cannot simply declare a function. If you coded it like this and tried to compile it, it would not compile. The reason for this is because C++ needs something called a header file. This is a file containing definitions, using that term very loosely, of all the variables and functions you plan on using in your code. Then, in the main file, you include the implementation of those definitions. The way I like to think about it is that the header file is essentially an abstract class that you implement in your main file.
This is great in some ways, and it is a nuisance in other ways. This is great because it forces you to think about exactly what you will need and build an outline of your code. It is a nuisance, because sometimes you will forget about the need for a header file, until you become familiar with the language that is. So, let’s get some hands on experience coding a header file!
We are going to add a function to our C++ program that computes a power. C++ has no standard operator like many other functions to compute a number to the nth power. First, we will need a header file. To add a header file to your code, go to your Solution Explorer. Then, right click Source File and go to Add->New Item, Ctrl+Shift+A. Click on Visual C++ in the side panel, and then click header file in the main panel. Name this file the same name as your .cpp file, which is the file we have been working on.
Visual Studio will create a new file for you and open it up. It should be completely empty except for a line at the top that says #pragma once. To use the header file, we will have to declare a class first. The method of doing that in C++ is like this:
class Hello_World {

};
This should be very intuitive because it is very similar in other languages. There is no need to declare the class as public, private, abstract, or anything like that. It is simply a class. Inside the class declaration we can implement public and private functions. To declare public or private functions inside the class we code it like this:
class Hello_World {
public:
  int pow(int x, int n);

private:
  void private_method();
};
As you can see, we declare which functions and variables are going to be private, and which ones will be public. This is also typically the format you follow when building a header file. We declare what the function is called, what parameters it takes, and what value it returns, but we do not implement it. That is saved for the .cpp file. You can also store variables inside the header file, and it makes it simple to create variables that are global to this class.
Now that we have a simple header file, we can implement these functions in our .cpp file. But, before we can implement them, we must link the header file to the .cpp file. To link the header, we simply add in an include statement.
#include "Hello World.h"

int Hello_World::pow(int x, int n)
{
  return 0;
}

void Hello_World::private_method()
{
  std::cout << "I am a private method on Hello_World" << std::endl;
}
All this code must be placed above your main function in the .cpp file. As you can see, the include is placed at the top of the file. I have also begun to implement the methods of our class. Declaring a method is an easy task. To do so you simply type out your class name, followed by two semicolons, followed by the method. The general rule follows like this:
return_type class_name::method(parameters)
{
  // Implementation goes in here...
}
Then, you replace return_type with the type that the function is to return, or void if it returns nothing. Replace class_name with the name of the class, method with the name of the method, and put your parameters in where the parameters are. And you implement your code in the center.
As a mini-challenge, implement the power function, and implement the private method. You can place anything you like inside the private method. The power method should return xn for any n > 0. For any n < 0 return -1, and for n == 0, return 1. Go ahead and try to implement that yourself. The correct implementation can be found on the Github repository.
Now you may be wondering how in the world are you supposed to test these methods? The answer is just like you would in another programming language. We will create an instantiation of our Hello World class and then call the methods from the object.
Hello_World* my_class = new Hello_World();
std::cout << my_class->pow(5, 3) << std::endl;
std::cout << my_class->pow(5, 0) << std::endl;
std::cout << my_class->pow(5, -1) << std::endl;
This code will create an instantiation of your Hello World class, and call each of the methods to test them. The correct output should be:
625
1
-1
⋮As the warning says, do not forget that because our class is a pointer, we must access its methods using the -> operator. It is intuitive when you use the Visual Studio IDE, because you can try the typing out class-> and if the class is a pointer, Visual Studio will suggest methods to use. If you are ever not sure whether you are dealing with a static method, a method on a pointer, or a method on a regular object, try typing in class::, class->, or class. and Visual studio will give suggested methods based on which operator is appropriate.
Section 6—Some Useful Libraries
Here are some useful libraries and some functionalities of these libraries. This is just so that you can complete the practice projects below. A standard practice among programming languages is the ability to add external libraries to your code. This is helpful for tasks like reading and writing to files, communicating with the operating system, using complex mathematical functions, using machine learning tools, etc. If you are ever not sure how to do something, Google it. The answer will most likely appear in the form of an external library, and sometimes it will not.
One library that is very useful is the
string_one.compare(string_two) == 0If you import the
Another useful library is the
There are so many more libraries out there that it would be very difficult to list them all and their functionalities. If you are ever in need of something that is not readily available in the standard C++ library though, feel free to search for another library. That concludes the brief introduction to C++. There are some practice projects that follow this section, and I would highly encourage you to read them and complete them yourself to prove proficiency with the C++ language. The answers to the coding challenges can be found at https://github.com/CodingMinecraft-1/Coding_Minecraft . If you’re solution is not the same, that does not mean your solution is wrong.
Good luck! The next chapter will introduce Blueprints and the Unreal Game Engine. We will build some simple projects and test the functionality of blueprints. And then we will begin coding Minecraft!
Practice Projects
1. Project 1 (Guess My Number) — Have you ever heard of the game guess my number? The premise is this, you think of a number between 1 and 1 000 000. Then the computer makes a guess, you type “H” to tell the computer to go higher, “L” to tell the computer to go lower, and “C” for correct. The computer has 20 guesses. Implement this in C++ using the basic operators for input and output. Include in the game a for loop, a while loop, a do-while loop, an if else statement, and the use of more than one function. Here is a sample run of the game:
Would you like to play a game(Y/N)?
Y
Guess a number between 1 and 1 000 000 and I will guess your number.
Ready?
3
2
1
Go!


I guess 500000
Type H for higher, L for lower, or C for correct.
H


I guess 750000
Type H for higher, L for lower, or C for correct.
H


I guess 875000
Type H for higher, L for lower, or C for correct.
L


I guess 812500
Type H for higher, L for lower, or C for correct.
H


I guess 843750
Type H for higher, L for lower, or C for correct.
L


I guess 828125
Type H for higher, L for lower, or C for correct.
C
Would you like to play a game(Y/N)?
N
Press any key to continue . . .
2. Project 2 (Hangman) — Create a program that pulls a word out of a dictionary (This can simply be an array of a few words, or an entire file of the English language). Once it pulls out the word, have it output the correct number of underscores in the format “_ _ _ _ _” where the number of underscores is the amount of letters. The user has 8 guesses, if the user does not guess it in those 8 guesses they lose. If they choose a letter that is in the word, replace the underscores with the letter. Also, keep an output of the letters available in the format: A B C D F G H J K L M P Q R S T U V W Z Where the used letters are missing.
3. Project 3 (Data Squashing) — It is often quicker to store a multi-dimensional array of numbers in one dimension. Create a formula that squashes a 3D array into a 1D array. This is a problem we will encounter in our game. So, if we have a 3D array of numbers, we want to squash it into a 1D array in the form: [0, 1, 2, 3, …, n] Where 0 is the value at the point (X1, Y1, Z1), the point 1 is the value at (X1, Y1, Z2) and so on. And n is the total number of points in our data structure. So, for example, given a cube with 8 3D points, we would like to store it in an array like this: [0, 1, 2, 3, 4, 5, 6, 7] Where each number in that array is the value associated with the (X, Y, Z) coordinate.